
Shooting for the stars: a guide to capturing stunning milky way photos
Astophotography is a fun part of photography. It truly is amazing to see the images on the back of the camera right after exposure. I remember the first time I did. Blew my mind what the camera could pickup that my eyes cannot!
Photographing the Milky Way can be a challenging but rewarding experience. To capture the best images of the galaxy, it is important to understand the basics of photography and have the right equipment. Here are some tips for taking great photos of the Milky Way:
Location: The most important aspect of capturing the Milky Way is finding a location that is far away from light pollution. The darker the location, the more visible the galaxy will be in your photos. To find dark locations near you, you can use apps such as "Dark Sky Finder" or "Light Pollution Map" which will show you a map of light pollution levels in your area. I mostly use on Andorid “TPE (The Photographer’s Ephemeris) - just learnt this is now only available on IOS and as a web app until the Android version gets some TLC”, “Star Walk 2”, “PhotoPills” or “Stellarium”.
Timing: The best time to photograph the Milky Way is during the new moon phase when the sky is the darkest. This typically occurs during the middle of the month.
Camera settings: To capture the Milky Way, you will need to use a camera that has manual settings. This will allow you to control the shutter speed, aperture, and ISO. A shutter speed of at least 20 seconds, aperture of f/2.8 or wider and ISO of 3200 or higher is recommended.
Shutter speed limitations: Wider lenses allow for slightly longer exposures before trailing of stars is visible. With my wide angle lens I can just get away with 25 seconds but with my telephoto after 2-3 seconds trailing occurs. To read more into this read about maximum shutter speeds at astrobackyard.com.
Tripod: A sturdy tripod is essential for taking photos of the Milky Way as it will keep your camera steady and prevent any blur caused by camera shake. To further increase sharpness use of a cable release or timer is recommended.
Focus: Since the Milky Way is far away, it can be difficult to focus your camera. To achieve a sharp image, you will need to focus manually. You can do this by finding a bright star in the sky and adjusting your focus until the star is sharp. Another option is to use the infinity focus point on your lens. This may take a few attempts to dial in but always a good idea to review your initial images to ensure the stars are nice and sharp.
Composition: The Milky Way can appear as a band of light in the sky, so it is important to incorporate other elements in your composition such as mountains, trees, or other landmarks to add depth and interest to your photos. Head on over to Nightscape Images for some truly amazing images of the night sky along tutorials, workshops, videos and much more. One of the best astro photographers I know.
Post-processing: Once you have taken your photos, you can edit them using software like Adobe Lightroom or Photoshop to enhance the colors and details of the Milky Way.
By following these tips, you can capture beautiful and unique photos of the Milky Way that you will treasure for a lifetime. Remember to be patient, and practice makes perfect. Happy shooting!
Camera gear I use for capturing the night skies
I run micro four thirds equipment and have no issues capturing great detail in the stars so you should be able to start capturing with the camera you have now!
Olympus OM-D EM-1 MKII - released December 2016
Peak Design Travel Tripod (Aluminium version)
A few examples capturing the Milky Way

Just down the road from home with some light fog

One Tree Hill Poppet Head in Bendigo

Local playground with amazing colours due to volcanic activity in the southern hemosphere

Captured at Lake Tyrrell in Victoria, Australia

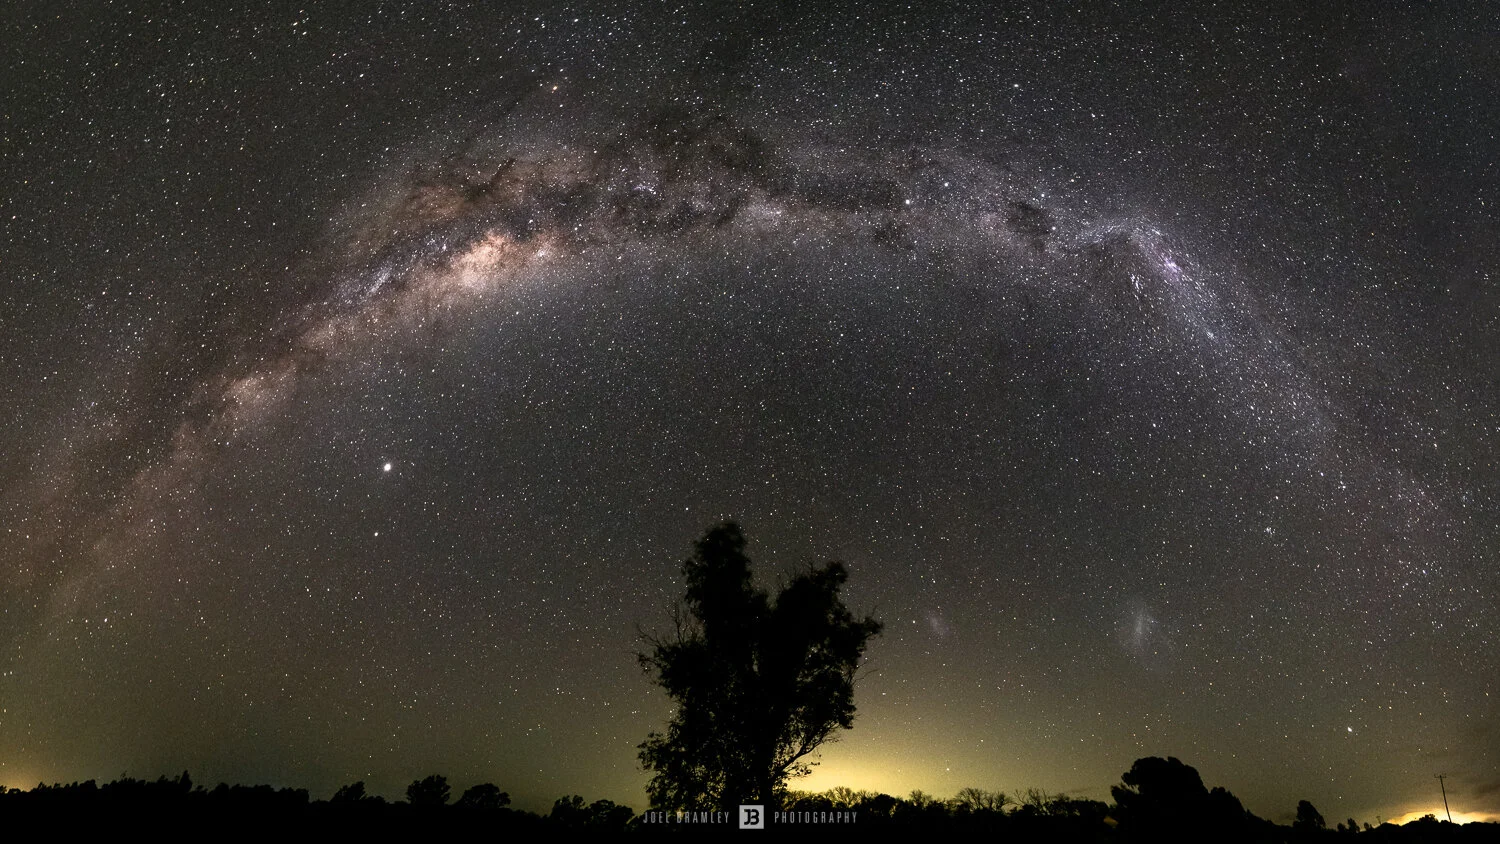
A local tree - they look great silhouetted against the stars